🔑"행동하지 않는 지식은 아무런 쓸모가 없다" - 안토니 로빈스
💡 AWS SES Spring Boot(Gradle) 환경에서 메일 보내기 A-Z
📃 AWS SES(Simple Email Service)는 Amazon에서 제공하는 클라우드 기반 이메일 전송 서비스입니다.
Spring Boot 환경에서 AWS SES를 활용하여 이메일을 발송하는 과정을 설명해보겠습니다. AWS SES 계정은 기본적으로 샌드박스 모드로 제공됩니다. 이 상태에서는 승인된 이메일 주소로만 메일을 보낼 수 있습니다. (프로덕션 모드는 AWS Support에 요청하여 프로덕션 모드로 전환해야합니다)
💻초기 설정 (준비 되어 있어야하는 설정)
1. AWS SES 시작하기 (Sandbox 모드)
AWS SES는 대량 이메일 전송을 위한 관리형 서비스로, 트랜젝션 이메일(ex: 주문 확인, 비밀번호 재설정), 마케팅 이메일, 알림 이메일 등을 보낼때 사용됩니다.
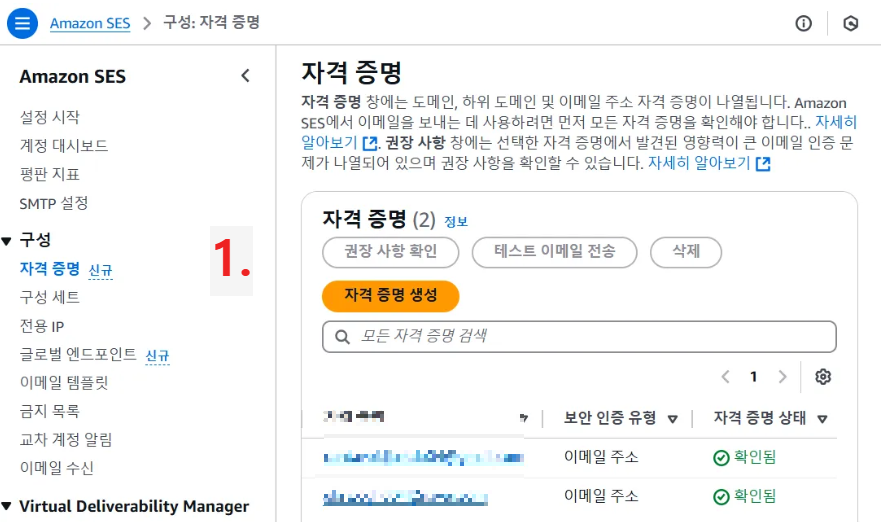
2. 자격 증명 생성

⬆️ AWS SES은 기본적으로 Sandbox 모드에서 보내는 메일과 받는 메일을 먼저 인식(등록)해야 합니다.
- AWS SES 페이지에 접속
- "Email Addresses"로 이동
- "Verify a New Email Address"를 눌러 보내는 메일과 받는 메일 모두 등록
💡 IAM 권한 부여 및 엑세스 키 & 시크릿 키 발급
📃 AWS SDK가 SES 이메일을 전송할 수 있도록 IAM에서 Access Key 및 Secret Key를 지정해야 합니다. 쉽게 말해 우리가 외부에서 AWS 관련 서비스를 사용하려 한다면, 엑세스 키와 시크릿 키를 사용하여 서비스를 사용하려는 주체의 권한 유무를 파악하는 데 필요합니다
💻AWS IAM
1. AWS IAM 콘솔에서 사용자를 생성해서 권한을 부여해줘야합니다(우리는 사용자를 생성했다는 가정하에 진행하겠습니다)
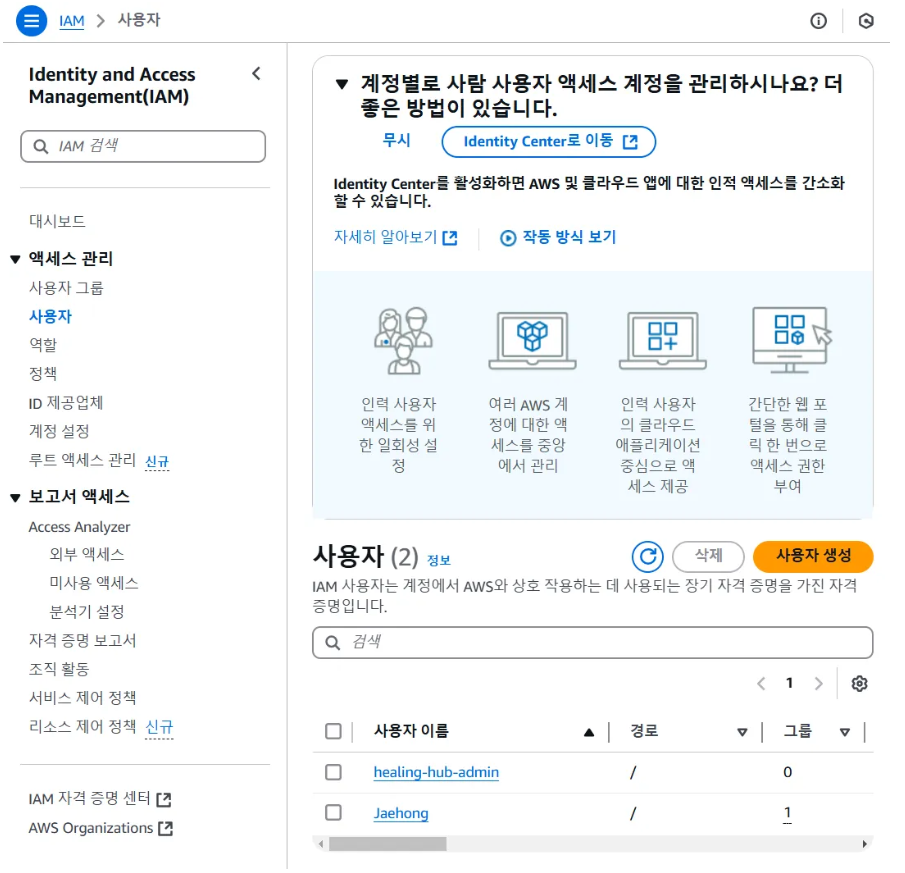
2. AWS IAM 콘솔에서 사용자를 클릭해서 들어가면 보안 자격 증명이라는 부분이 있습니다

3. 보안 자격 증명에서 엑세스 키 섹션에서 엑세스 키 만들기라는 부분이 있습니다. 저는 이미 두개의 엑세스 키를 발급받았기 때문에 버튼이 비활성화 되어 있네요

4. 만들게 되면, 엑세스 키와 시크릿 키를 발급받게되는데, 로컬 환경에서 안전한 곳에 저장해두셔야합니다. 나중에는 시크릿 키 확인을 할 수 없어서 까먹으시면 삭제하고 다시 발급받아야합니다
💡 Springboot(Gradle) 설정 해주기
📃 이제 Springboot에서 Gradle 프로젝트를 생성해줍니다
💻Springboot (Gradle) 초기 설정


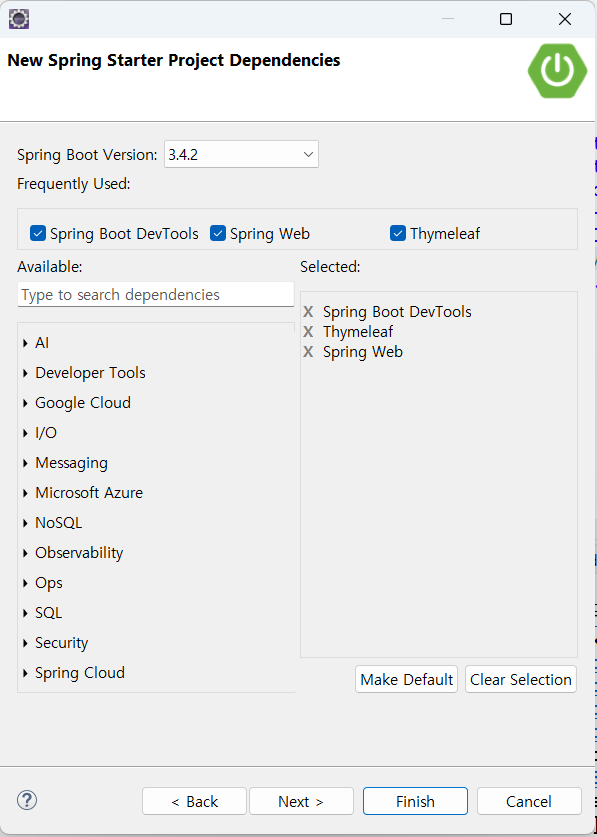
💻build.gradle
dependencies {
	implementation 'org.springframework.boot:spring-boot-starter-thymeleaf'
	implementation 'org.springframework.boot:spring-boot-starter-web'
	developmentOnly 'org.springframework.boot:spring-boot-devtools'
	testImplementation 'org.springframework.boot:spring-boot-starter-test'
	testRuntimeOnly 'org.junit.platform:junit-platform-launcher'
	// https://mvnrepository.com/artifact/com.amazonaws/aws-java-sdk-ses
	implementation 'com.amazonaws:aws-java-sdk-ses:1.12.781'
}
💻src/main/resources/application.yml
aws:
  ses:
    access-key: Your-Access-Key
    secret-key: Your-Secret-Key
    send-mail-to: 이메일 주소(보내는 주소)
  region: ap-northeast-2 (서울 리전)
💻SES Configuration (DefaultSESConfiguration.java)
package com.example.demo.configuration;

import org.springframework.beans.factory.annotation.Value;
import org.springframework.context.annotation.Bean;
import org.springframework.context.annotation.Configuration;
import org.springframework.context.annotation.Profile;

import com.amazonaws.auth.AWSStaticCredentialsProvider;
import com.amazonaws.auth.BasicAWSCredentials;
import com.amazonaws.regions.Regions;
import com.amazonaws.services.simpleemail.AmazonSimpleEmailService;
import com.amazonaws.services.simpleemail.AmazonSimpleEmailServiceClientBuilder;

@Configuration
public class DefaultSESConfiguration {
	@Value("${aws.ses.access-key}")
	private String accessKey;

	@Value("${aws.ses.secret-key}")
	private String secretKey;

	@Bean
	public AmazonSimpleEmailService amazonSimpleEmailService() {
		BasicAWSCredentials basicAWSCredentials = new BasicAWSCredentials(accessKey, secretKey);
		return AmazonSimpleEmailServiceClientBuilder.standard()
				.withRegion(Regions.AP_NORTHEAST_2)
				.withCredentials(new AWSStaticCredentialsProvider(basicAWSCredentials))
				.build();

	}
}
💻Template Configuration (TemplateConfiguration.java)
package com.example.demo.configuration;

import org.springframework.context.annotation.Bean;
import org.springframework.context.annotation.Configuration;
import org.thymeleaf.TemplateEngine;
import org.thymeleaf.spring6.SpringTemplateEngine;
import org.thymeleaf.spring6.templateresolver.SpringResourceTemplateResolver;

@Configuration
public class TemplateConfiguration {
	@Bean
	public TemplateEngine htmlTemplateEngine(SpringResourceTemplateResolver springResourceTemplateResolver) {
		TemplateEngine templateEngine = new SpringTemplateEngine();
		templateEngine.addTemplateResolver(springResourceTemplateResolver);

		return templateEngine;
	}
}
💻 Email Service Implementation (EmailServiceImpl.java)
package com.example.demo.service;

import org.springframework.beans.factory.annotation.Autowired;
import org.springframework.stereotype.Service;
import org.thymeleaf.TemplateEngine;
import org.thymeleaf.context.Context;
import com.amazonaws.services.simpleemail.AmazonSimpleEmailService;
import com.amazonaws.services.simpleemail.model.*;

@Service
public class EmailServiceImpl implements EmailService {

    @Autowired
    private AmazonSimpleEmailService amazonSimpleEmailService;

    @Autowired
    private TemplateEngine templateEngine;

    private static final String FROM = "cantavoidjustdo04@gmail.com";

    @Override
    public void sendTemplateEmail(String to, String subject, String templateName, Object model) {
        try {
            // Thymeleaf context 설정
            Context context = new Context();
            context.setVariable("model", model);

            // HTML 템플릿 처리
            String htmlContent = templateEngine.process(templateName, context);

            // 이메일 요청 생성
            SendEmailRequest request = new SendEmailRequest()
                .withDestination(new Destination().withToAddresses(to))
                .withMessage(new Message()
                    .withBody(new Body()
                        .withHtml(new Content()
                            .withCharset("UTF-8")
                            .withData(htmlContent))
                        .withText(new Content()
                            .withCharset("UTF-8")
                            .withData("This is a HTML email. Please use an HTML-compatible email client.")))
                    .withSubject(new Content()
                        .withCharset("UTF-8")
                        .withData(subject)))
                .withSource(FROM);

            // 이메일 전송
            amazonSimpleEmailService.sendEmail(request);

        } catch (Exception e) {
            throw new RuntimeException("Failed to send email", e);
        }
    }
}
💻 Controller (EmailController.java)
package com.example.demo.controller;

import org.springframework.beans.factory.annotation.Autowired;
import org.springframework.web.bind.annotation.GetMapping;
import org.springframework.web.bind.annotation.RequestMapping;
import org.springframework.web.bind.annotation.RestController;

import com.example.demo.model.TestModel;
import com.example.demo.service.EmailService;

@RestController
@RequestMapping("/api/email")
public class EmailController {

    @Autowired
    private EmailService emailService;

    @GetMapping("/test")
    public String testEmail() {
        // 테스트용 모델 데이터
        TestModel model = new TestModel("Test User");

        emailService.sendTemplateEmail(
            "qkrwoghd04@naver.com",
            "Welcome Email",
            "welcome",
            model
        );

        return "Email sent successfully!";
    }
}
💻 Model (TestModel)
package com.example.demo.model;

public class TestModel {
    private String userName;

    public TestModel(String userName) {
        this.userName = userName;
    }

    public String getUserName() {
        return userName;
    }
}
💻 src/main/resources/templates/welcome.html
<!DOCTYPE html>
<html lang="ko" xmlns:th="http://www.thymeleaf.org">
<head>
    <meta charset="UTF-8" />
    <meta http-equiv="X-UA-Compatible" content="IE=edge" />
    <meta name="viewport" content="width=device-width, initial-scale=1.0" />
    <title>HaruHan</title>
</head>
<body style="font-family: Arial, sans-serif; margin: 0; padding: 0; background-color: #f5f5f5;">
    <div style="max-width: 600px; margin: 0 auto; padding: 20px;">
        <div style="background-color: #ffffff; padding: 30px; border-radius: 8px; box-shadow: 0 2px 4px rgba(0,0,0,0.1);">
            <a href="#" style="text-decoration: none; color: #333;">
                <p style="font-size: 24px; font-weight: bold; margin: 0;">HaruHan</p>
            </a>
            <h2 style="color: #333; margin: 20px 0;">HaruHan 구독을 환영합니다.</h2>
            <p style="color: #666; line-height: 1.6;">
                신규 구독을 환영합니다. 🎉 <br>
                <br>
                앞으로 <b>오전 7시마다</b> 저희가 직접 고르고 작성한 면접 질문과 답변을 보내드릴게요.<br>
                <br>
                HaruHan을 찾아주셔서 진심으로 감사드립니다.<br/>
                <br/>
                <span style="font-size: 14px; color: #888; font-style: italic;">*구독자분들의 휴식을 위해, 주말에는 메일을 보내드리지 않아요. 참고해 주세요.</span> <br>
            </p>
        </div>
    </div>
</body>
</html>
⬆️ 전 코드의 가독성을 굉장히 중요시해서 css 파일을 따로 static/css/ 아래에 분리해서 link 태그로 주입해주려했지만, 이메일 템플릿에서 외부 CSS 파일을 참조하는 것이 제한적이라서 CSS를 인라인으로 직접 포함시켜야한다고 하더군요... 이 부분에 있어서는 더 좋은 방법이 있는지 찾아봐야겠네요
💻 최종 프로젝트 트리 (css/* 부분은 불필요합니다)

📝 SUMMARY
📌 다음과 Test 프로젝트를 구성해주고, Springboot 프로젝트를 실행시켜줍니다
다음과 같이 CMD 혹은 Postman이나 Talend API Tester를 통해서 설정해준 API 앤드포인트로 요청을 보내면,


⬆️ Email sent successfully! 라는 응답을 받게 되는 것을 볼 수 있습니다. 그리고 설정해준 이메일로 아래와 같이 Welcome.html 탬플릿이 도착했네요!

qkrwoghd04 - Overview
Major : Information and Computing Science Xian-Jiaotong Liverpool University(2024.08 Graduated) - qkrwoghd04
github.com